- Fix. Init. Getting user fixed.
- Fix. Cron. PID comparing fixed. (#46)
- Upd. SFW. Definition of modes, output of statuses for each mode (#47)
How to Update the CleanTalk Anti-Spam Plugin for Joomla 3.x – 6.x
- How to Update the CleanTalk Anti-Spam Plugin for Joomla 3.x
- How to Update the CleanTalk Anti-Spam Plugin for Joomla 4.x - 6.x
How to Update the CleanTalk Anti-Spam Plugin for Joomla 3.x
Text version
1. Go to Joomla Administrator Panel → Extensions → Manage → Manage.
2. Find the plugin "Anti-Spam by CleanTalk", tick it, and press the button "Uninstall". Confirm the uninstall in the warning that appears.
3. Download the plugin archive from CleanTalk (the link is at the beginning of this page, or use the link given to you personally).
4. Go to Extensions → Manage → Install.
5. Go to the tab "Upload Package File" and browse for the installation package.
6. After the installation, go to Extensions → Plugins → Anti-Spam by CleanTalk.
7. Switch the status to "Enabled" and set up the plugin. Make sure that the access key matches the key from your CleanTalk Dashboard. Then press the button "Save".
8. (Optional) Test the protection by making a registration using this blacklisted email address: stop_email@example.com
Version with pictures
1. Go to Joomla Administrator Panel → Extensions → Manage → Manage.
2. Find the plugin "Anti-Spam by CleanTalk", tick it and press the button "Uninstall". Confirm the uninstall in the appeared warning.
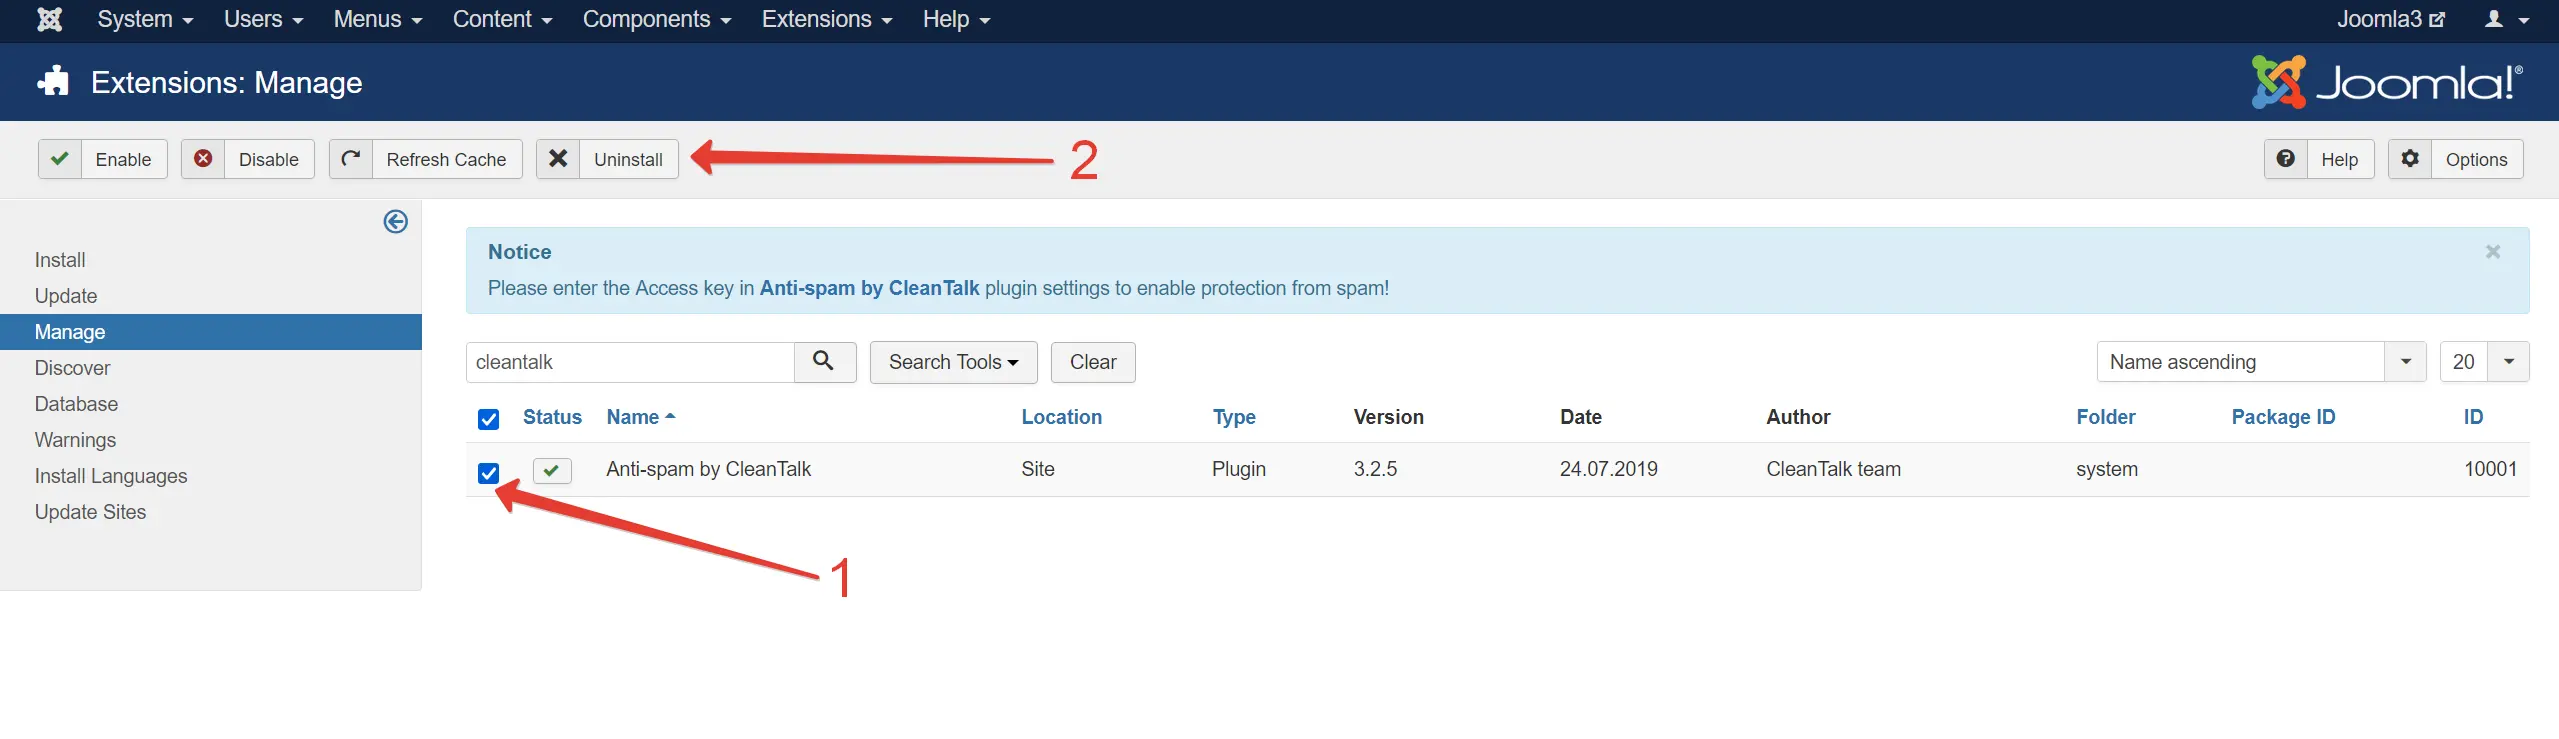
3. Download the plugin archive from CleanTalk (the link is at the beginning of this page or use the link given to you personally).
4. Go to Extensions → Manage → Install.
5. Go to the tab "Upload Package File" and browse for the installation package.
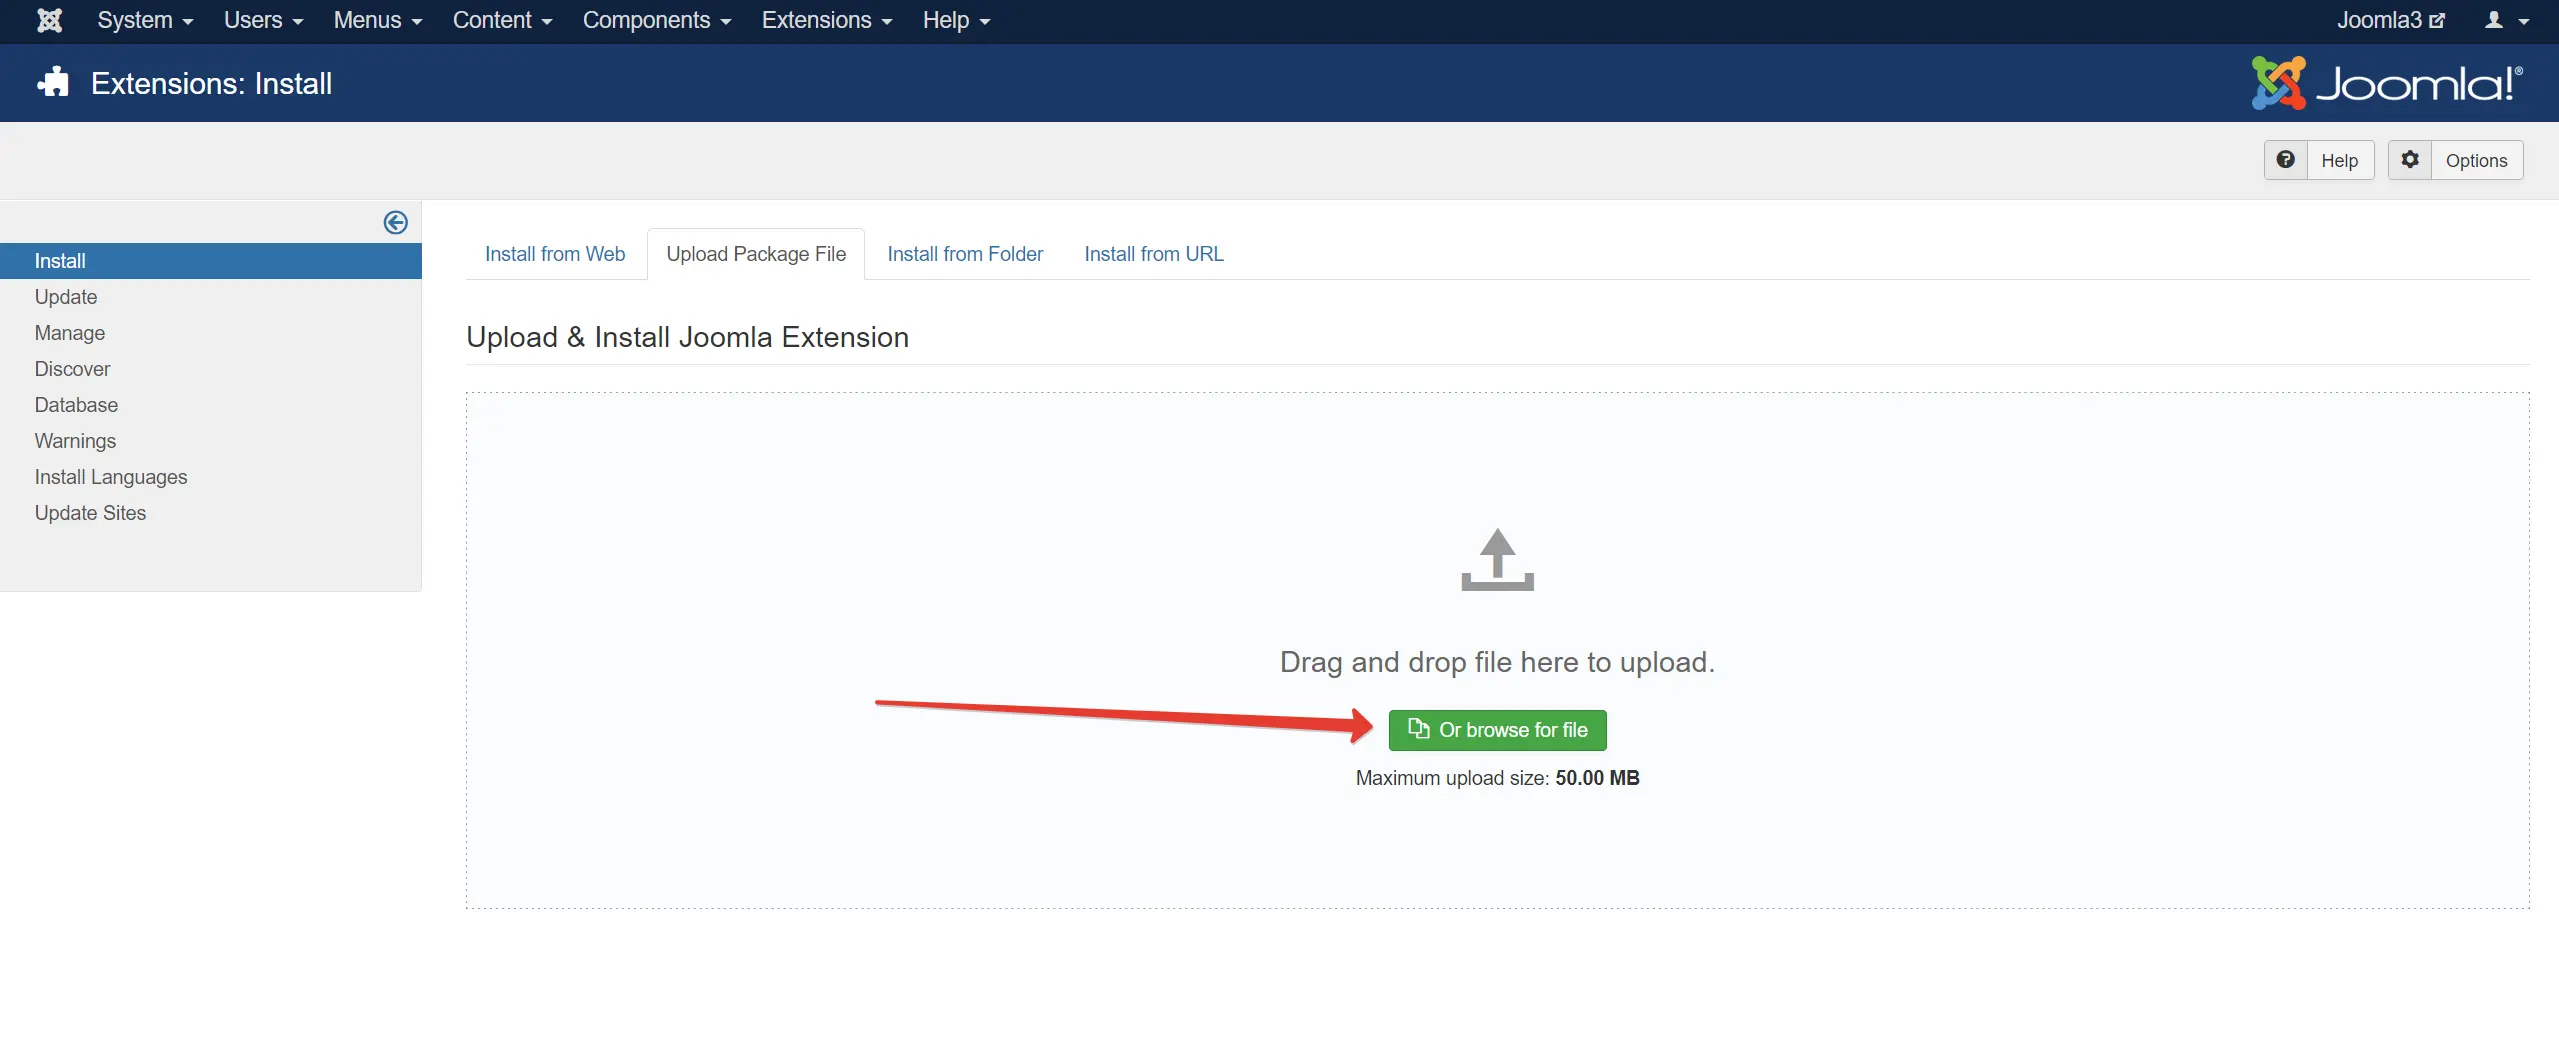
6. After the installation, go to Extensions → Plugins → Anti-Spam by CleanTalk.
7. Switch the status to "Enabled" and set up the plugin. Make sure that the Access key matches the key from your CleanTalk Dashboard. Then press the button "Save".
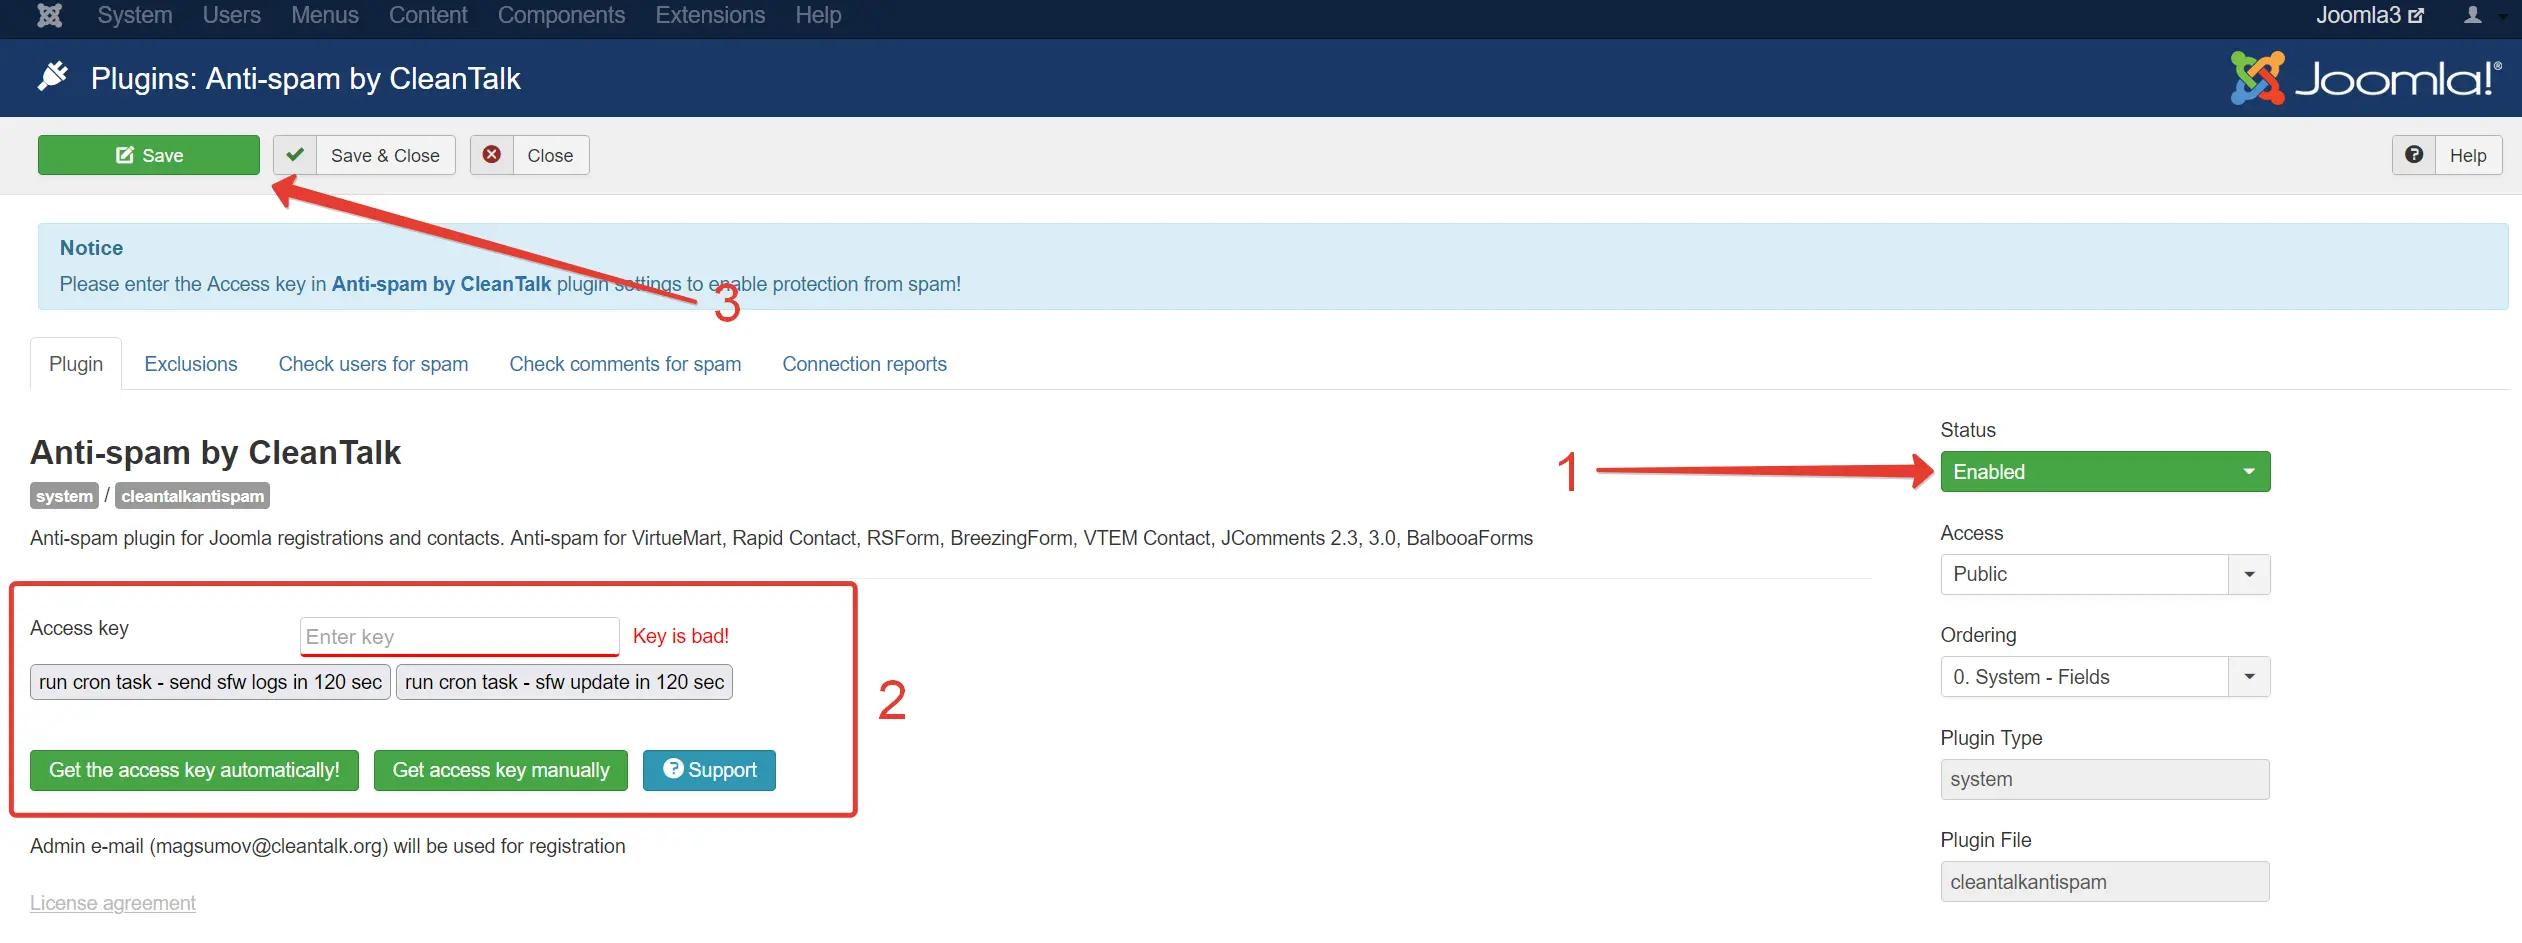
Give Dashboard a few minutes to change your Anti-Spam status.
Please, go to Dashboard to see the Anti-Spam status, add new websites or manage existing ones!
Congratulations. The Anti-Spam is updated!
Updating Joomla from version 3.x to 4.x/5.x
If you are upgrading from Joomla 3.x to 4.x or 5.x, please uninstall the Anti-Spam plugin before updating!
How to Update the CleanTalk Anti-Spam Plugin for Joomla 4.x – 6.x
Text version
1. Go to Joomla Administrator Panel → System → Manage → Extensions.
2. Find the "Anti-Spam by CleanTalk" plugin (you can use the search function and enter "cleantalk"), tick it, and press the "Uninstall" button. (Press Action → Uninstall if you are using Joomla 5.x or 6.x). Confirm the uninstall in the appeared warning.
3. Download the plugin archive (the link is at the beginning of this page, or use the link given to you personally).
4. Go to System → Install → Extensions.
5. Go to the tab "Upload Package File" and browse for the installation package.
6. After the installation, go to System → Manage → Plugins → Anti-Spam by CleanTalk.
7. Set the plugin status to "Enabled" and enable the desired options in the settings. Make sure that the access key matches the key from your CleanTalk Dashboard. Then press the "Save" button.
8. (Optional) Test the protection by making a registration using this blocklisted email address: stop_email@example.com. This request must be blocked.
Version with pictures
1. Go to Joomla Administrator Panel → System → Manage → Extensions.
2. Find the "Anti-Spam by CleanTalk" plugin (you can use the search function and enter "cleantalk"), tick it and press the "Uninstall" button. Confirm the uninstall in the appeared warning.
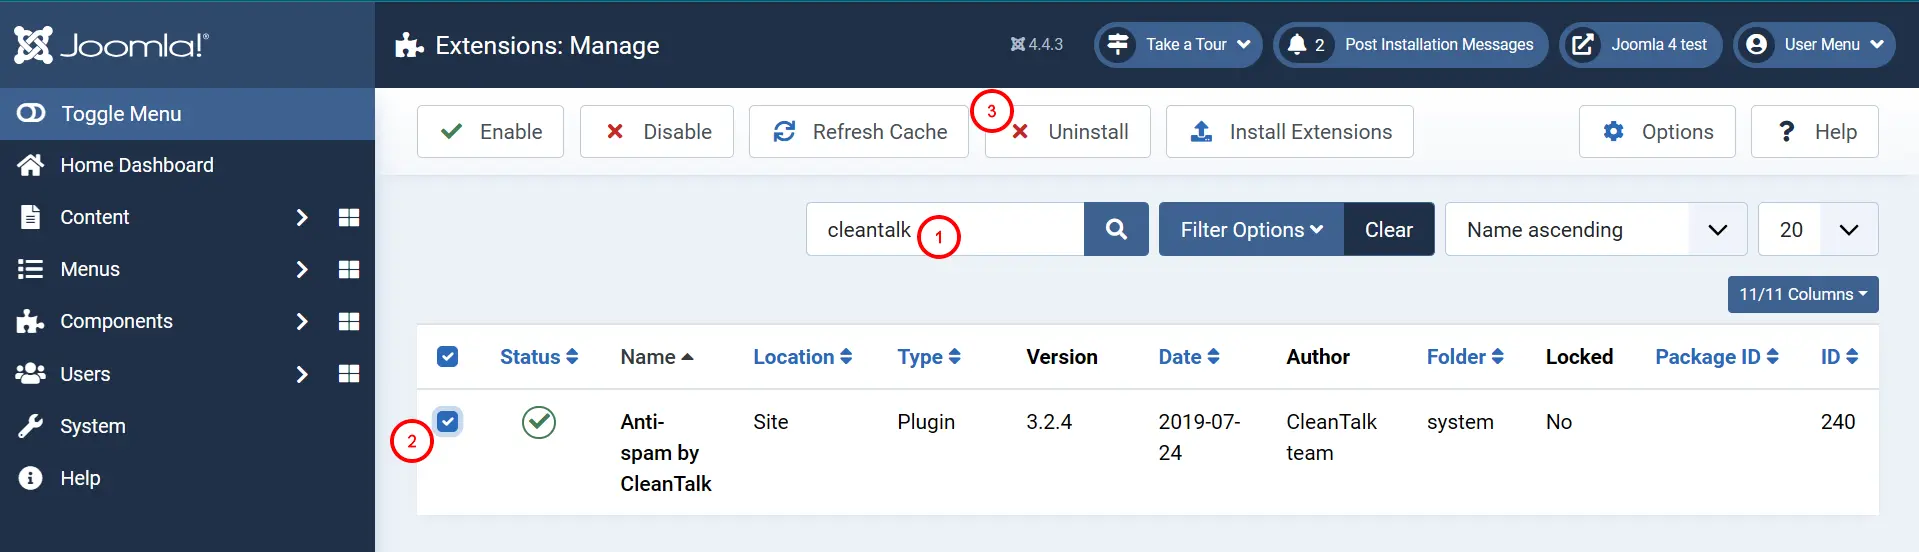
Note: Press Action → Uninstall if you are using Joomla 5.x or 6.x)
3. Download the plugin archive (the link is at the beginning of this page or use the link given to you personally).
4. Go to System → Install → Extensions.
5. Go to the tab "Upload Package File" and browse for the installation package.
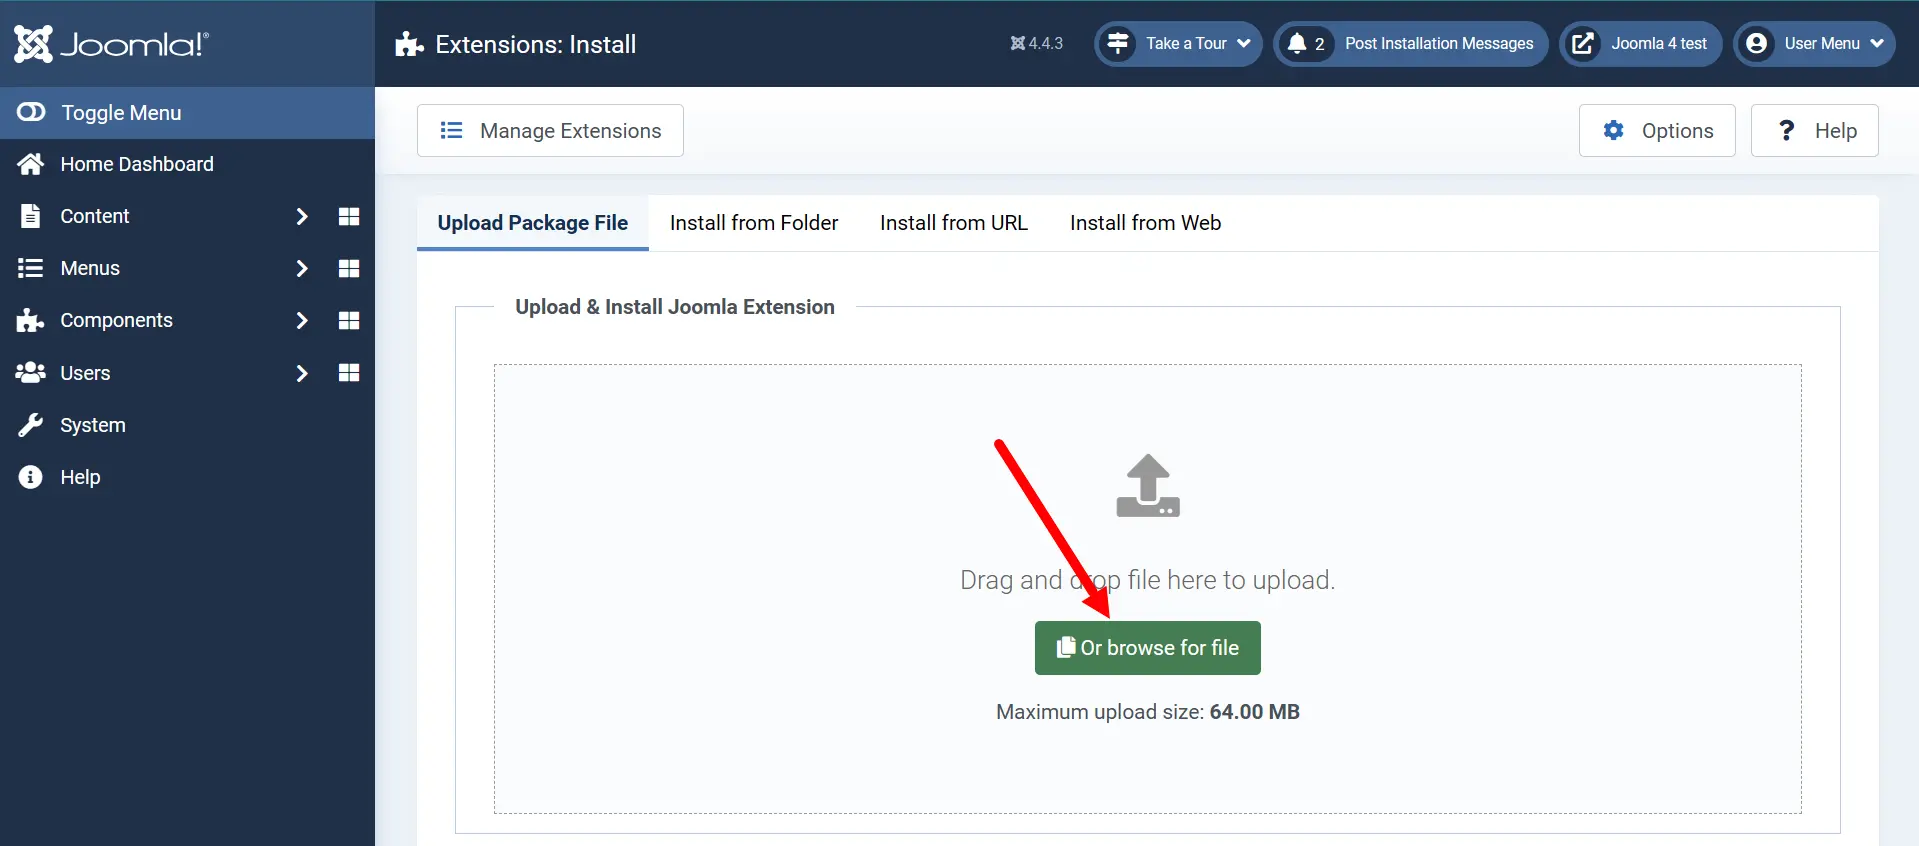
6. After the installation, go to System → Manage → Plugins → Anti-Spam by CleanTalk.
7. Set the plugin status to "Enabled" and enable the desired options in the settings. Make sure that the access key matches the key from your CleanTalk Dashboard. Then press the "Save" button.
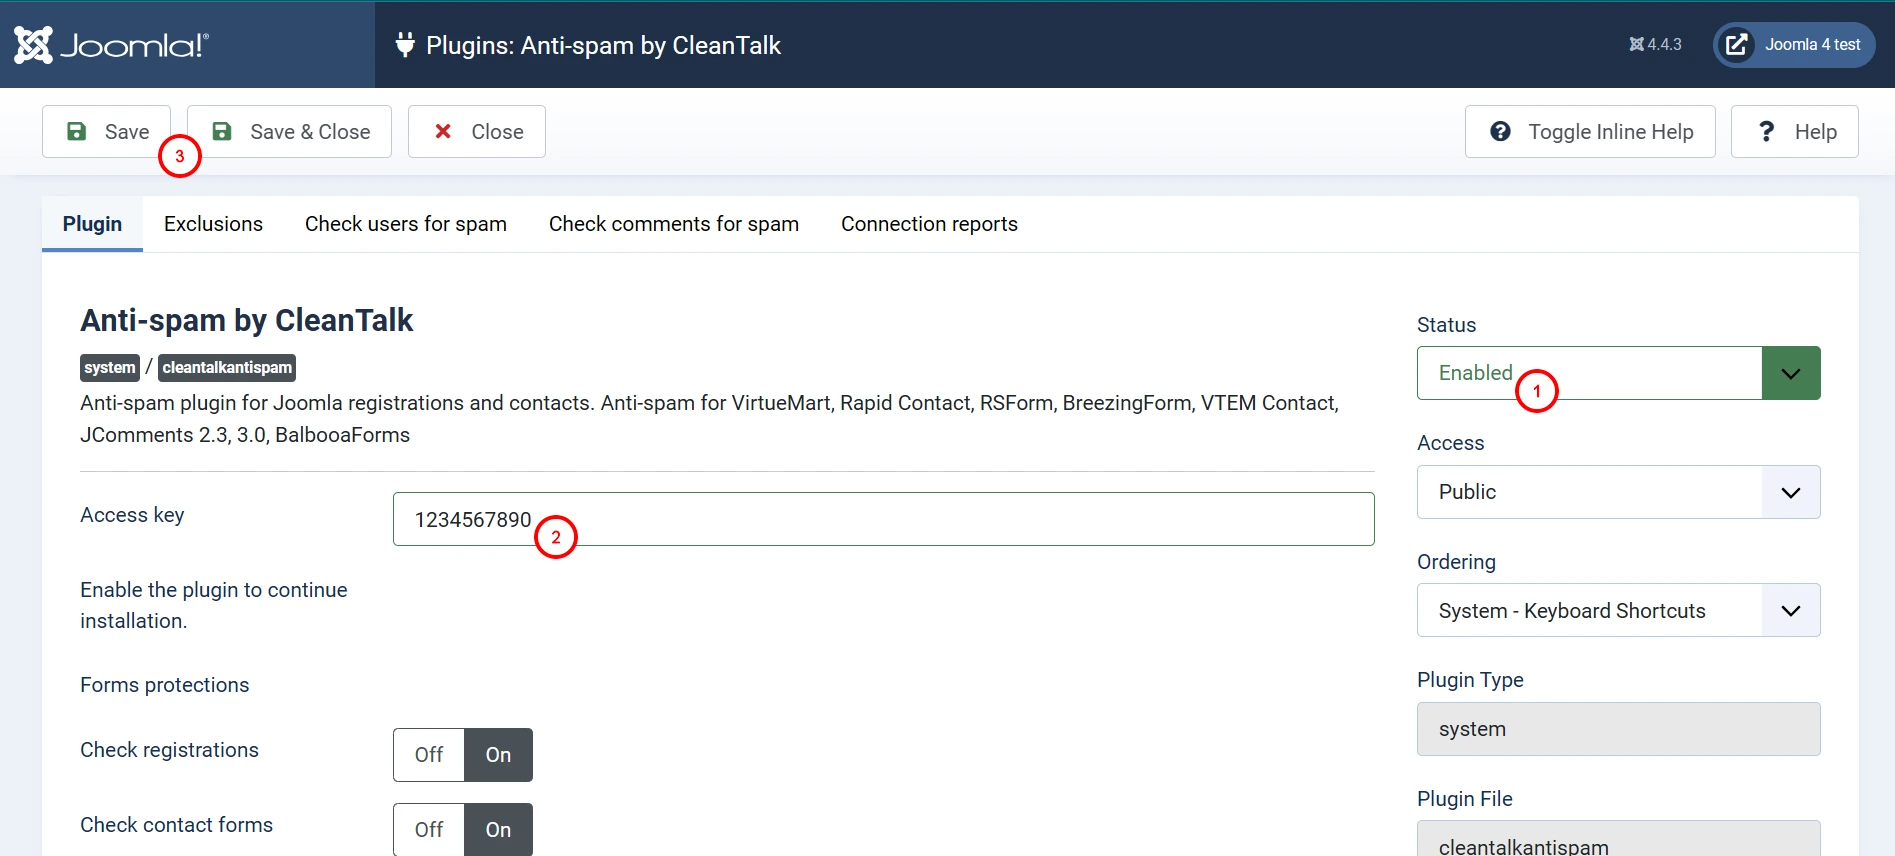
8. (Optional) Test the protection by making a registration using this blocklisted email address: stop_email@example.com. This request must be blocked.
Couldn't find what you were looking for? Contact our technical support team for assistance.
It would also be interesting
- CleanTalk Payment FAQFAQ — Payment Is it paid? Description of the payment process for a CleanTalk Anti-Spam...
- What Features are Included in a CleanTalk Extra Package for Anti-Spam ServiceCleanTalk Extra Package for Anti-Spam Service 45-Day Log Stop-Words Country Block List Customize Response...
- Updating the CleanTalk Anti-Spam Extension on OpenCart 3.xHow to Update the CleanTalk Anti-Spam Extension on OpenCart 3.x 1. Go to the OpenCart Administrator...