Installation process of an SSL Certificate
1. First, go to your SSL Certificates Dashboard. Choose "SSL Certificates" in the "Services" menu.

2. Add new certificate by clicking the blue button "Add cert" or orange button "Get now certificate" if you don't have any certificates yet.

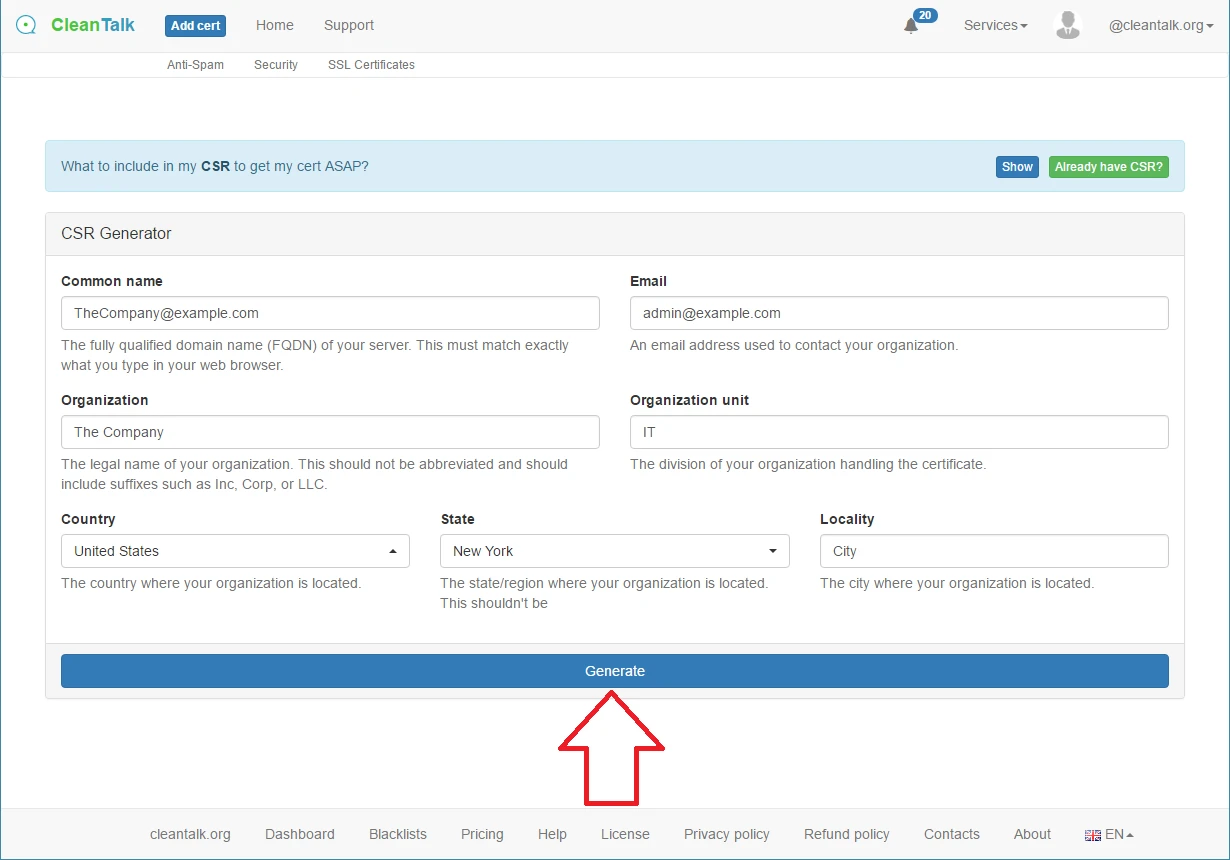
3. Fill all fields of the CSR generator with your data and press the button "Generate". If you have generated your CSR before, then press the green button "Already have CSR", enter it and press the button "Read my CSR".

OR

4. Check if everything is correct and press the button "Confirm and Apply CSR".

5. Select what e-mail you want to use to get your SECTIGO Validation Mail.

6. After that you will be redirected to your CleanTalk SSL Dashboard again. Press the button "Checkout" to purchase created certificate.

7. Choose your currency using the pop-down menu over the table, choose the payment method (Stripe ore PayPal), and make a payment.


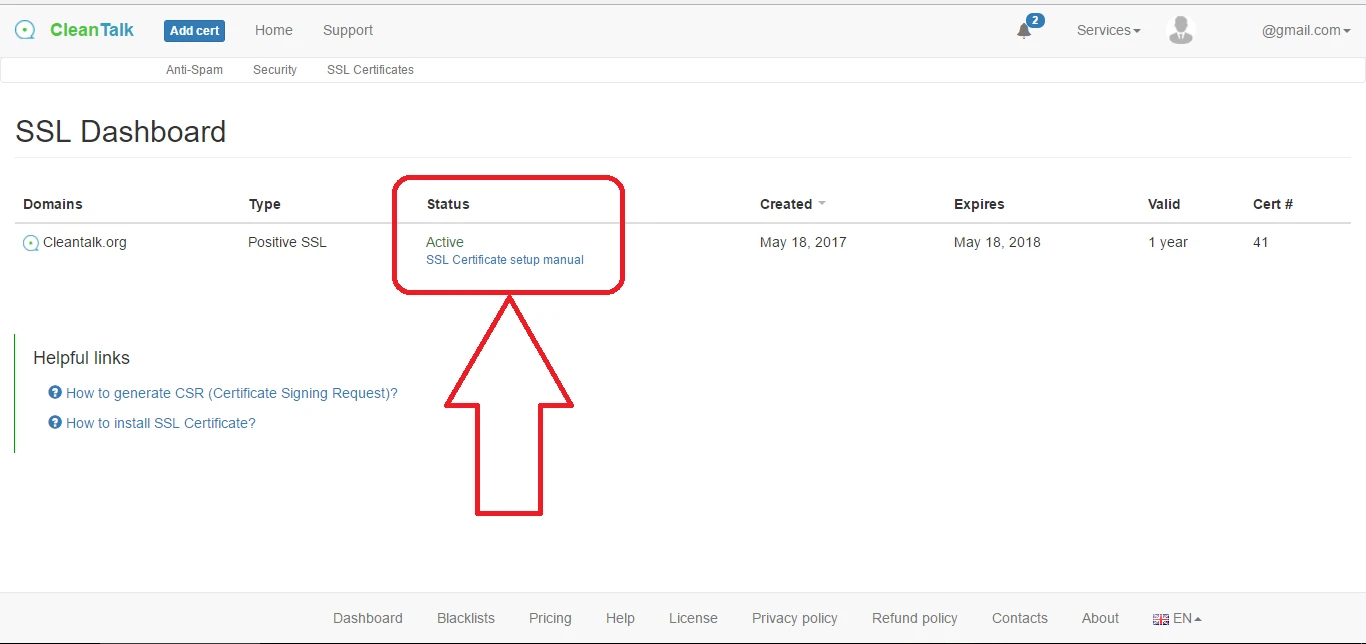
8. Check your inbox, open the letter and follow the instruction SECTIGO have sent to you. After successful validation, the status in your CleanTalk Control Panel will be changed to "Active". Your SSL Certificate is ready to be used.

9. Set up your web server. Setup instructions for Nginx and Apache see below.
> > > Please, keep in mind the following information:
> > > If you use a Virtual Hosting and don't have access to your Web Server Command Line you can contact your Hosting Service Support and they will install your certificate for you.
> > > Some Hosting Providers may charge you additional fee for installing SSL Certificate.
> > > Or you can install SSL Certificate yourself using Hosting Provider's help page.
> > > How to install SSL certificate for your hosting.
Nginx Web Server
Combine everything for nginx:
1. Combine crt files into a bundle (the order matters, here):
cat www_example_com.crt COMODORSADomainValidationSecureServerCA.crt COMODORSAAddTrustCA.crt AddTrustExternalCARoot.crt > ssl-bundle.crt
2. Store the bundle wherever nginx expects to find it:
mkdir -p /etc/nginx/ssl/example_com/
mv ssl-bundle.crt /etc/nginx/ssl/example_com/
3. Ensure your private key is somewhere nginx can read it as well:
mv example_com.key /etc/nginx/ssl/example_com/
4. Make sure your nginx config points to the right cert file and to the private key you generated earlier:
server {
listen 443;ssl on;
ssl_certificate /etc/nginx/ssl/example_com/ssl-bundle.crt;
ssl_certificate_key /etc/nginx/ssl/example_com/example_com.key;# side note: only use TLS since SSLv2 and SSLv3 have had recent vulnerabilities
ssl_protocols TLSv1 TLSv1.1 TLSv1.2;# ...
}
5. Restart nginx.
Apache Web Server
Apache on Ubuntu 14.04.
Make a backup of your configuration file by copying it. Assuming your server is running on the default virtual host configuration file, /etc/apache2/sites-available/000-default.conf, use these commands to to make a copy:
cd /etc/apache2/sites-available
cp 000-default.conf 000-default.conf.orig
Then open the file for editing:
sudo vi 000-default.conf
Find the entry and modify it so your web server will listen on port 443:
Then add the ServerName directive, if it doesn't already exist (substitute your domain name here):
ServerName example.com
Then add the following lines to specify your certificate and key paths (substitute your actual paths here):
SSLEngine on
SSLCertificateFile /home/sammy/example.com.crt
SSLCertificateKeyFile /home/sammy/example.com.key
If you are using Apache 2.4.8 or greater, specify the CA intermediate bundle by adding this line (substitute the path):
SSLCACertificateFile /home/sammy/intermediate.crt
If you are using an older version of Apache, specify the CA intermediate bundle with this line (substitute the path):
SSLCertificateChainFile /home/sammy/intermediate.crt
At this point, your server is configured to listen on HTTPS only (port 443), so requests to HTTP (port 80) will not be served. To redirect HTTP requests to HTTPS, add the following to the top of the file (substitute the name in both places):
ServerName example.com
Redirect permanent / https://example.com/
Save and exit.
Enable the Apache SSL module by running this command:
sudo a2enmod ssl
Now restart Apache to load the new configuration and enable TLS/SSL over HTTPS!
sudo service apache2 restart
Test it out by accessing your site via HTTPS, e.g. https://example.com
You will also want to try connecting via HTTP, e.g. http://example.com to ensure that the redirect is working properly!
Sources:
https://gist.github.com/bradmontgomery/6487319#install-the-commodo-ssl-cert
How to install SSL certificate for your hosting
There are links to Hosting Providers' guides which help you to install your SSL certificate:
- GoDaddy: https://godaddy.com/help/install-my-ssl-certificate-16623
- HostGator: https://www.hostgator.com/help/article/how-do-i-use-the-third-party-ssl-certificate-i-purchased
- IONOS: https://www.ionos.com/help/server-cloud-infrastructure/accordions-to-plesk-panel/administration/installing-an-ssl-certificate-in-plesk/
- iPage: https://www.ipage.com/help/article/ssl-certificate-installation-steps
- FatCow: https://www.fatcow.com/help/article/ssl-certificate-installation-steps
- Bluehost Web Hosting: https://www.bluehost.com/help/article/ssl-installation-of-3rd-party-certificate
- Google Cloud Platform: https://www.ssls.com/knowledgebase/how-to-install-an-ssl-certificate-on-google-cloud-platform/
- Dreamhost Web Hosting: https://help.dreamhost.com/hc/en-us/articles/215089668-How-do-I-install-a-third-party-SSL-certificate-
- A2 Hosting: https://www.a2hosting.com/kb/security/ssl/installing-a-third-party-ssl-certificate
- SiteGround Hosting: https://www.siteground.com/kb/install_third_party_ssl/
- InterServer Hosting: https://www.interserver.net/tips/kb/install-ssl-certificate-cpanel/
- Inmotion Hosting: https://www.inmotionhosting.com/support/website/ssl/install-third-party-ssl/
- Liquid Web: https://www.liquidweb.com/kb/install-a-ssl-certificate-on-a-domain-using-cpanel/
It would also be interesting
- How do I generate a CSR code? CSR Creation, Create Certificate Signing RequestHow to generate CSR (Certificate Signing Request)? Nginx: Generate CSR Prior to purchasing...
- SSL Certificates Dashboard of the CleanTalk ServiceSSL Certificates Dashboard How to download SSL Certificate How to create your own CA bundle...
- SSL Certificates FAQ...