- Включение двухфакторной аутентификации
- Включить двухфакторную аутентификацию через одноразовые коды
- Отключить двухфакторную аутентификацию через одноразовые коды
- Экстренное отключение двухфакторной аутентификации
Опция двухфакторной аутентификации для WordPress
1. Опция двухфакторной аутентификации поможет вам усилить защиту от взлома сайта. Она включается здесь:
Панель Администратора WordPress → Настройки → Security by CleanTalk → Основные настройки → категория "Аутентификация и авторизация" → выберите значение опции "Двухфакторная аутентификация (2ФА)" как "Вкл" или "Только для новых устройств".
Для активации опции будет использоваться почтовый адрес того администратора сайта, который ее включает.
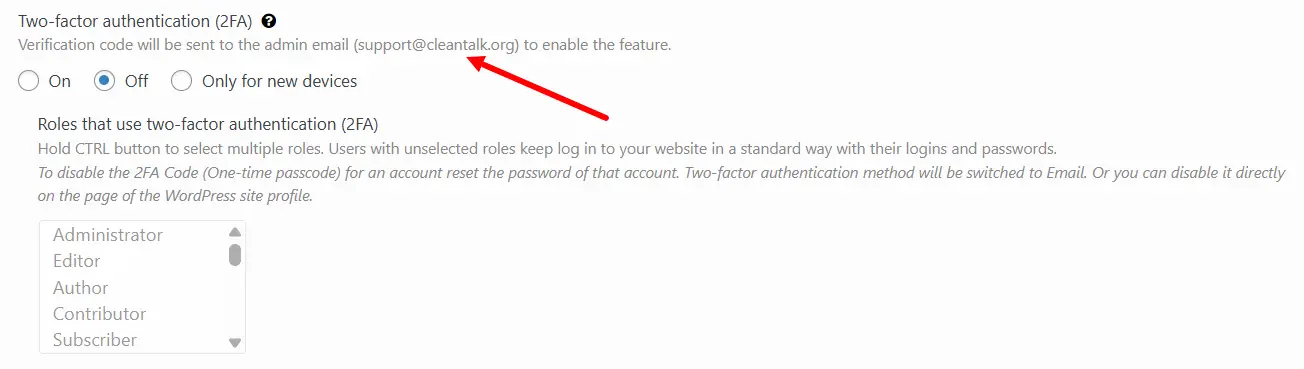
- Вкл означает, что опция будет работать каждый раз, когда вы входите в административную часть сайта.
- Только для новых устройств означает, что опция будет работать в тех случаях, когда вы входите в административную часть сайта с нового устройства (ноутбуки, другие компьютеры, мобильные устройства, планшеты и так далее).
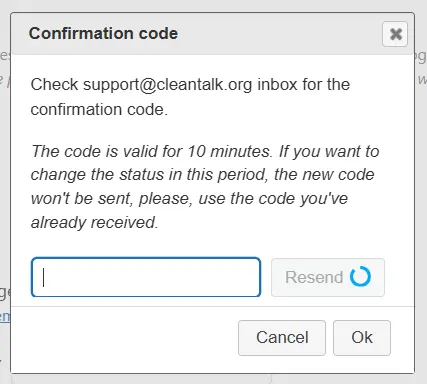
2. Появится модальное окно для проверки, получили ли вы письмо с кодом от вашего сайта.
3. Проверьте вашу почту. Письмо выглядит вот так:

Важно! Если вы не получили письмо (и в спам оно тоже не попало), то вам нужно проверить настройки почтового сервера вашего сайта, потому что именно он отправляет письма с кодами, а не серверы CleanTalk.
4. Когда код будет введен, вы можете выбрать роли, для которых будет работать 2ФА. По умолчанию опция работает только для Администраторов. Удерживайте клавишу CTRL нажатой для выбора нескольких ролей.

5. Нажмите на сохранение настроек плагина.
В следующий раз при входе на сайт под пользователем, для которого установлена 2ФА, вы увидите окно авторизации от CleanTalk:

Когда Вы видите такое окно, это означает, что код авторизации был отправлен на почту вашего пользователя, и он будет действовать 10 минут.
Включить двухфакторную аутентификацию через одноразовые коды
После включения CleanTalk 2FA каждый пользователь может переключить её на аутентификацию через одноразовые пароли. Есть 2 способа использования приложения для одноразовых кодов 2ФА:
1. Зайдите в вашу Панель Управления WordPress → Профиль
2. Найдите раздел "Двухфакторная аутентификация CleanTalk" и нажмите "Включить код 2ФА (одноразовый пароль)":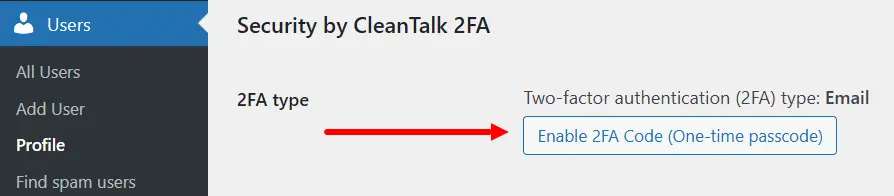
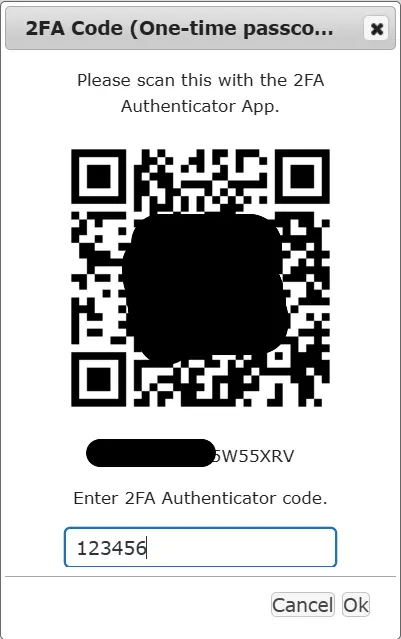
3. Вы увидите QR код и код для ручной активации.
4. Установите и запустите приложение для одноразовых паролей для Android или iOS (данные приложения приведены для примера).
5. Нажмите кнопку "Begin":
6. Выберите "Scan a barcode". Если вы не можете использовать вашу камеру, то выберите "Enter a provided key".

7. Отсканируйте QR код. Вы должны увидеть экран с новой записью Authenticator:

7A. Введите имя аккаунта и код ручной активации с 3-го шага этой инструкции. Установите тип в "Time Based".

Вы должны увидеть экран с новой записью Authenticator:
8. Вернитесь на шаг 3, введите код из приложения и нажмите Ok:
9. 2ФА через одноразовые коды активирована для вашего аккаунта WordPress.
1. Зайдите в вашу Панель Управления WordPress → Профиль
2. Найдите раздел "Двухфакторная аутентификация CleanTalk" и нажмите "Включить код 2ФА (одноразовый пароль)":
3. Вы увидите QR код и код для ручной активации.
4. Установите расширение для браузера (данное расширение приведено для примера).
5. Нажмите на кнопку расширения:

Выполните следующие действия, введите имя аккаунта и код ручной активации с шага 3:
6. Вы должны увидеть, что новая запись добавлена:

7. Вернитесь на шаг 3, введите код из расширения и нажмите Ok:
8. 2ФА через одноразовые коды активирована для вашего аккаунта WordPress.
Использование двухфактороной аутентификации через одноразовые коды
Есть 2 способа войти с одноразовым кодом:
1. Откройте форму авторизации вашей Панели Управления WordPress и пройдите первый этап аутентификации с логином и паролем.
2. Сайт выдаст запрос одноразового кода.

Запустите ваше мобильное приложение для одноразовых кодов и найдите код для вашего сайта (приложение приведено для примера):
3. Введите код и нажмите "Log In". Одноразовый код ограничен по времени. Если вы получили сообщение об ошибке, попробуйте новый код.
4. Если код правильный, вы попадёте в вашу Панель Управления WordPress.
1. Откройте форму авторизации вашей Панели Управления WordPress и пройдите первый этап аутентификации с логином и паролем.
2. Сайт выдаст запрос одноразового кода.
Откройте расширение браузера и скопируйте код для вашего сайта (расширение приведено для примера):
3. Введите код и нажмите "Log In". Одноразовый код ограничен по времени. Если вы получили сообщение об ошибке, попробуйте новый код.
4. Если код правильный, вы попадёте в вашу Панель Управления WordPress.
Отключить двухфакторную аутентификацию через одноразовые коды
Чтобы отключить, выполните следующее:
1. Зайдите в вашу Панель Управления WordPress → Профиль
2. Найдите раздел "Двухфакторная аутентификация CleanTalk" и нажмите "Отключить приложение двухфакторной аутентификации (2ФА)":

3. 2ФА через одноразовые коды отключена.
Экстренное отключение двухфакторной аутентификации
Если по какой-либо причине вы не можете пройти второй этап аутентификации, вы можете отключить опцию двухфакторной аутентификации через вашу Панель управления CleanTalk:
1. Переключитесь на консоль безопасности: меню "Продукты" → выберите "Безопасность сайта". Прямая ссылка: https://cleantalk.org/my?cp_mode=security.
2. Найдите ваш сайт и нажмите на ссылку "Настройки" под его именем.
3. Отметьте опцию "Отключение двухфакторной аутентификации (2FA)" и нажмите кнопку "Обновить". После обновления страницы чек-бокс опции снова станет неотмеченным - это нормально.

Теперь подождите несколько минут пока серверы CleanTalk отправляют плагину команду отключить опцию на вашем сайте.
Попробуйте войти на сайт снова.
Если возникнут какие-либо вопросы по работе нашего модуля, то Вы можете задать их через:
— Обращение [ https://cleantalk.org/my/support/open ].

Будет так же интересно
- Описание всех возможностей плагина Security by CleanTalkВозможности плагина Security by CleanTalk Защита от брутфорс-атак Отчёт...
- Удаление профиля аккаунта отказ от сервиса CleanTalkКак удалить свой аккаунт, отменить подписку, или отключить...
- Как защитить форму с помощью honeypot поляОпция honeypot-поле для WordPress Мы добавили дополнительную...